How to Connect a Security Camera to Wi-Fi Easily?
People who have never used a Wi-Fi security camera think that connecting it to a Wi-Fi network is quite complicated. However, it is extremely simple that almost anyone who uses a smartphone can do it.
In this article, we will take you through the step-by-step process of connecting a security camera to a Wi-Fi network. We will share different methods so that you can connect the security camera of any brand.
Can You Easily Connect a Security Camera to Wi-Fi?
Connecting a security camera to Wi-Fi is straightforward. It is just as simple as connecting your smartphone to any Wi-Fi.
All you need to do is install the security camera application on your smartphone. Then, you need to scan the QR code of the camera or enter the IP address. And once you enter the Wi-Fi credentials, the camera will be connected to your Wi-Fi.
Preparation Before Connecting a Security Camera to Wi-Fi
Here are three important steps before connecting a security camera to Wi-Fi.
Choosing Reliable Wi-Fi Security Camera
Reolink Duo 3 Wi-Fi
Duo 3 Wi-Fi is a Wi-Fi 6 dual-lens security camera. It records a 180⁰ panoramic view in 16MP resolution. You get to see exceptionally clear videos with rich details. It summarizes a 15-second video in one picture, which is incredible. Even at night, it uses colored and black-and-white night vision to offer crystal-clear videos.
It can detect motion automatically and track the movement. It can distinguish between a person, pet, or vehicle and send real-time alerts to the connected devices. You can communicate with the person in front of the camera through two-way audio, and it can also scare intruders via dual warnings. It is a smart camera compatible with Alexa and Google Assistant.

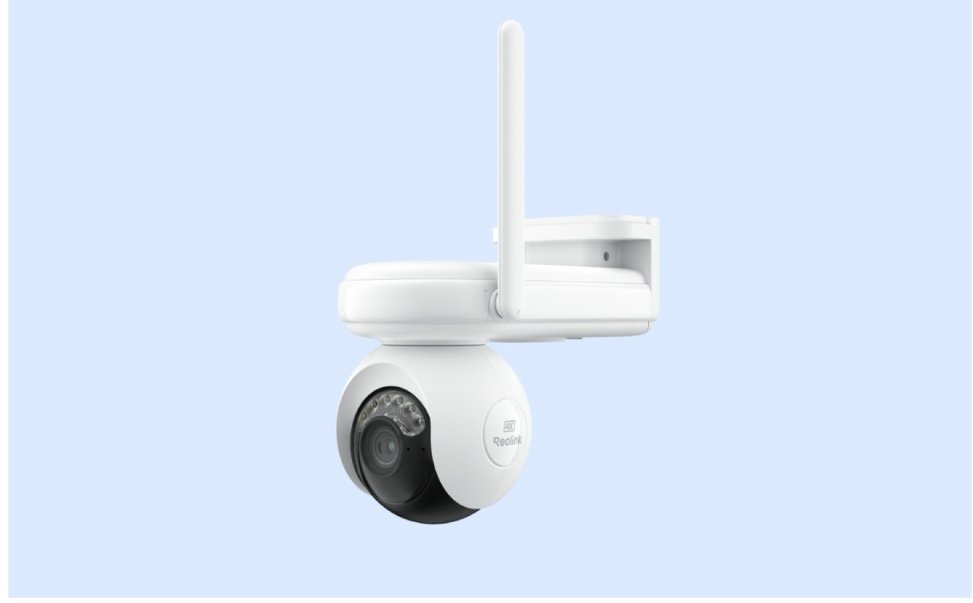
Reolink Altas PT Ultra
Altas PT Ultra is a pan-and-tilt Wi-Fi 6 security camera. It can cover a 360⁰ view and automatically track the motion of objects. It offers 4K resolution, which records everything with incredible clarity. It’s a battery-powered security camera with a battery capacity of 20,000mAh, which can last for a long time. Plus, it can also be connected to a solar panel for automatic recharging.
The camera is equipped with Reolink ColorX technology. It can capture true colors and details even in extreme darkness. It stores videos on a microSD card and supports up to 512GB, which is more than enough.
Check Wi-Fi Signal Strength and Coverage
Wherever you are placing the security camera, make sure the signal strength is suitable to offer excellent speed and seamless performance. Install the camera within the Wi-Fi range. Otherwise, the camera will disconnect often or work slowly.
Setting Wi-Fi Router
Set up the Wi-Fi router, and the ideal location would be the center of your house. Connect the power and configure the settings through your computer. Finally, set the password, and your cameras are ready to connect.
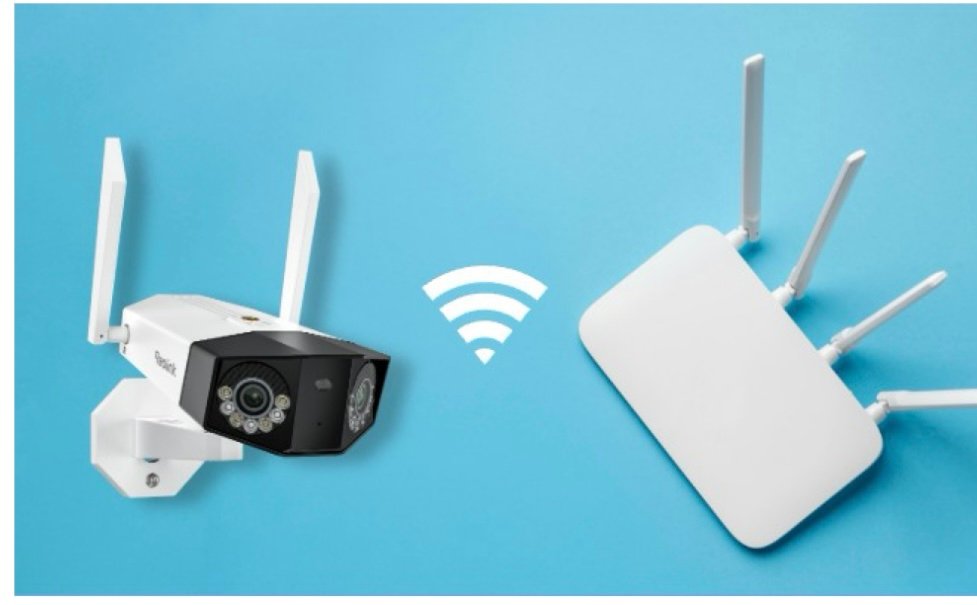
How to Connect Security Cameras to Wi-Fi?
Connecting a security camera to Wi-Fi is extremely simple. Let’s see the actual steps taking Reolink Wi-Fi cameras as an example.
How to Connect Cameras to Wi-Fi without cable?
Step 1: Install the Reolink application on your mobile devices and open it. Tap the “+” button in the top right corner of the screen.
Step 2: Turn on the camera. If it needs power, connect it. Now, scan the QR code at the back of the camera.
Step 3: Tap Choose Wi-Fi Connection. Configure the Wi-Fi settings. Tap Next. You will hear, “I have heard the voice played by the camera.” Tap Next.
Step 4: Tap Scan Now. Scan the QR code on the app through the camera lens. Once you hear the beep, tap Next.
Step 5: Once you hear, “Connection to the router succeeded,” tap Next. Create a password, name your device, and complete the initialization process.
How to Connect Cameras to Wi-Fi Router Using a Network Cable?
Step 1: Power on the camera by connecting the DC adapter. Use the provided Ethernet cable to connect the camera to the LAN port of the Wi-Fi router.
Step 2: Your phone should also be connected to the same router. Open the Reolink app. Tap the hamburger icon and tap Settings. Tap Add Devices Automatically.
Step 3: Now, go to the Camera tab. You will see the uninitialized device there. Tap it.
Step 4: Tap Choose Network Cable Connection. Make sure the camera is connected properly. Tap Access the Camera.
Step 5: Create a password and name the device. Select the Wi-Fi network and enter the password to connect. Tap Finish.
How to Optimize Wi-Fi for Security Camera Connection?
Here are a few tips and tricks to optimize Wi-Fi for the security camera connection.
- Place the router in the middle of your house to ensure even connectivity in every direction.
- The security camera should be within the Wi-Fi range. It is better if the signals are strong to ensure a stable connection.
- Select the right Wi-Fi band. For long ranges and obstacles, 2.4GHz is the best choice. For faster speed, you can go with 5GHz.
- If you are experiencing any interference, keep such devices away from the cameras and routers.
- Update the firmware of your cameras regularly.
FAQs
Why won’t my security camera connect to my Wi-Fi?
There can be various reasons for an unsuccessful connection. The security camera could be out of the Wi-Fi range, the router could be overloaded, the settings could be incorrect, or the firmware could be outdated. Figure out the root cause and then solve the issue accordingly.
How do I connect my camera to new Wi-Fi?
It depends on the camera you are using. You might need to reset the camera or connect to the new Wi-Fi from the application settings. Some cameras also require an Ethernet connection with the router to change Wi-Fi settings.
Conclusion
Connecting a security camera to Wi-Fi is quite easy if you know the right steps to follow. We have shared the steps in detail so that you can connect the security camera of any brand to any Wi-Fi network. Just make sure the camera is within the Wi-Fi range and properly working, you will be able to connect to any Wi-Fi network without any hassle.