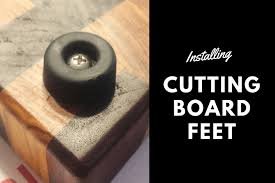
How to Build an End Grain Cutting Board

How to Build an End Grain Cutting Board

The goal of this tutorial is to show you exactly how to build an end grain cutting board by following the step-by-step process detailed here using words, pictures, and video to walk you through the process.

Building an end grain cutting board is not necessarily a beginner woodworking project, but it is not an advanced woodworking project either. If you are familiar with your power tools and have made a few projects using various hardwoods, you should absolutely jump right in and build an end grain cutting board today! You may also be interested in learning How to Build a Standing Knife Rack.

Here is a video showing my process for building end grain cutting boards to give you an idea of what’s involved:

Materials

What wood is best for cutting boards?

There are a variety of different wood species that can be used for cutting boards. Some may be great for a normal face grain cutting board or edge grain butcher block but not so good for an end grain cutting board. The most common hardwoods that you see cutting boards made from in North America are the most common domestic hardwoods: Walnut, Cherry, and Maple. When shopping for wood for your end grain board, pay special attention to the end grain of the boards since this is what will show. Maybe you want an edge of sapwood on your Walnut boards to try to make a diamond patterned end grain cutting board?

What glue for cutting boards?

This can be a heated topic of discussion around woodworkers, but my recommendation is to use Titebond III Ultimate Wood Glue. I know many people use Titebond II, but the main benefit I see from using Titebond III for a cutting board glue-up is that it is waterproof. You want to be able to wash your cutting board right? The Titebond 3 provides a great open time for working that can be very helpful when working on a glue-up for a large end grain cutting board. You do not need any biscuits, dominos, dowels, or other mechanical fasteners for a cutting board. I have made end grain island tops as big as 3’x4′ with nothing but wood glue. While we are talking about gluing, check out the Glu Bot to greatly ease the process of glue application and shelf life of your wood glue!

What tools do I need to make a cutting board?

This is a very open-ended question that I could go on for days about and still not really answer it. You could make a cutting board with no tools at all actually. You could buy pre-cut hardwood strips from online or your local wood supplier, apply glue, clamp them together with ratchet straps, and hand sand the entire thing once dry. That doesn’t sound like much fun though, so I do not recommend this!

My woodshop is not outfitted with all the nice big power tools that I would like, but I have enough to be fairly efficient at making even the more complicated end grain cutting boards with different designs and larger sizes. Lot’s of people will tell you that you need a drum sander to even think about making an end grain cutting board, that is false. I do not own a drum sander nor will I ever put an end grain cutting board through the planer (this can be disastrous).

How to build an End Grain Cutting Board in 9 Steps

Step 1: Select and mill your lumber

Depending on your tool selection in your shop, you may want to purchase the wood to build your end grain cutting board from a hardwood dealer that has the tools and abilities to take your rough stock lumber and turn it into square and straight boards. Either way, your boards need to have at least two flat and square sides. There are various methods involving jointers, planers, routers, tracksaws, etc that can accomplish this. Once you have that you are good to go and can make your parallel cuts on the table saw or using a circular saw.

Whether you do the work yourself or have your hardwood dealer do it, now is the time to thickness your boards. You want your boards as thick as you want them wide in your final construction. So if you want 1″ strips of wood making up your final board than thickness all of your wood to 1″ (or 4/4 if you want to speak the lingo). Now if you want a thicker, 2″ strip in your end grain boards (this is what I use most often), then you need to use 8/4 wood to accomplish this.

Step 2: Laying out your board and cutting to length

Now that you have clean boards that are the desired thickness it is time to cut them to length and layout your board construction.

So let’s say we are using 8/4 (2″) thick lumber and we want our end grain block to be 12″ wide, 18″ long, and 1.5″ thick…..

I want to round up to 1.75″ thickness to allow some room for flattening..

So we will need to start with a board that is 12″x16″. In reality I would probably go to 13″ or so wide to allow room for trimming. The 16″ number is arrived at by dividing our final dimension (18″) by our current board thickness (2″), multiplying by our desired thickness (1.75″) and rounding up to the nearest inch.

Depending on what saw you will be cutting with, also add in some cushion for the saw kerf. This can vary but is typically 1/8″ or so.

So now you have several boards that when laid out come to a measurement of somewhere around 13″ wide x 16″ long and still 2″ thick.

Arrange these boards how you would like to make patterns, etc with the grain. If possible, alternate the grain direction so if the end grain is an arch in one board orient it to be a U in the next board. I hope that made sense….

Step 3: The initial glue up

So your end grain board is all laid out, let’s get to gluing. As mentioned, I only use Titebond III in my cutting board construction. It is waterproof and food safe.

Apply the glue liberally to one side of each joint, spread the glue evenly, and clamp it together. There a countless methods for gluing and clamping, so I’m not going to go into much here. A with any glue up, your goal should be to get everything as even as possible. This shouldn’t be too difficult since your board are the same thickness, but using clamping cauls can help with this process.

For the price and strength it is hard to beat using 3/4″ black or galvanized pipe from your local hardware store and Bessey 3/4″ pipe clamps. F-style clamps are also a good choice, I prefer the orange Jorgeson clamps but I don’t believe they make them any longer, so you could get the comparable Jet Clamps.

I would also recommend using some 6″ bar clamps or something similar to clamp overlapping the joints to assist in a flat glue up.

For this first glue up, you can either wipe the glue off with a damp rag while it’s still wet or wait until dry and scrape of any excess glue. Once dry you will proceed to flatten the board by either a power planer, drum sander, hand plane, etc. This is a very important step to ensure their are no gaps in your final end grain board between the strips. If your glue up was perfect (not sure this has ever happened for me), you can just sand off the glue excess and move to the next step without having to mechanically flatten the board again.

Step 4: Cut the strips for the final glue up

Here is where you set your table saw, track saw, miter saw, hand saw, or whatever you’re using to cut your end grain strips (1.75″ strips in my example from earlier).

As you cut the strips, keep them in order as they come off the saw, this will help in the uniformity and ultimate layout of your board. Once your have them all cut, flip them 90 degrees so that your beautiful end grain is now facing up.

This is where you can have some fun flipping and turning the pieces as you wish to create a visually pleasing pattern with the end grain of your wood.

Once you have your board laid out it’s time for the second and final glue up. (unless your going for one of those psychedelic chaos boards that use a ton of wood and give me a headache to look at)

Step 5: The final glue up

Much like the 1st glue up, using the same glue process to spread the glue on one side of each joint and clamp them together. Using cauls, additional clamps, etc to ensure the board is as flat as possible. As before, you can wipe or scrape the glue after clamping the board.

After 24 hours in the clamps she is ready for the next step!

Step 6: Flattening an end grain board

Like most of the other steps, there are many ways to go about flattening your end grain board. Some of these include a router flattening jig (my preferred method), drum sander, hand planes, and old fashioned hand sanding (may take a few weeks). There is always one in the crowd that says they’ve been putting end grain boards through their planer since they were in diapers without issue, please do not do this. The risk is too great for a failure of the board and/or planer not to mention the tear out, potential deep grooves, and fact that a planer can not get the sides flat and square to each other.

I will go into further detail on my flattening process in a later post, but you can look back in my Instagram feed for some pictures or see the jig in use on my YouTube video. It is basically a router with a 2″ flattening bit riding in a carriage across two rails. I use tape or wedges to hold the end grain board in place, flatten one side then repeat for the other side.

Step 7: Final dimensioning and edging

Using whatever saw method you choose, here is where you cut your board to it’s final length and width. Pay close attention to make sure your sides are square to each other. In the video posted above, I used a new Ridgid Worm-drive saw and Kreg Rip Cut Jig. It did the trick, but in my dream shop a sliding table saw would be the ideal tool for the job.

If you had some chipout that occurred during flattening, you can cut it off if really bad, but hopefully its just on a edge that can be routed off.

Once trued up, you can use your router bit of choice (typically roundover or chamfer for me) to put all of the edges on the board.

This is also the point where you would add any hand holds, juice grooves, and drill holes for rubber feet. You can see my other posts on how to route handles in a cutting board and installing rubber feet on a cutting board.

Step 8: SANDING an end grain cutting board

Lots and lots of sanding. I use my ROS for this progressing from 60, 100, 150, 220, 320, and finally a hand sanding with 600 grit paper. A drum sander or even larger orbital sander would make this process go a lot faster, but you have to make due with the tools that you have! Whatever you use, please use the proper respiratory protection to save your lungs!

After the 220 grit sanding, I will brand the board and raise the wood grain with water before another round of 220 grit sanding followed by the 320 and finishing with the 600 grit hand sanding.

Step 9: Finishing the board

Now that your board is nice and smooth, proceed to finishing the board with whichever food-safe finish you choose. I know some use Salad Bowl Finish, I find it too plastic-like and kind of defeats the purpose of a warm, natural, wood board for me.

I choose to use food grade mineral oil for a few really heavy soakings follows by a coat or two of my BorkWood Butter, a food-safe oil/wax blend.

Don’t forget to check out some of the Tools from my Shop as well as other Woodworking Projects.

And of course, if you are not ready to build an end grain cutting board on your own please check out my inventory or reach out to me directly for a custom order!

Matt

Matt is a passionate woodworker, father of four, and number cruncher by day. His love for woodworking was sparked by his great-grandfather's carpentry legacy and nurtured by his dad's DIY spirit. Encouraged by his wife, Matt turned his woodworking hobby into a successful side hustle, focusing on creating custom cutting boards and engaging with a thriving online community. Now, he's shifting gears to share his knowledge and passion through Borkwood Blog, where he hopes to inspire and connect with fellow woodworking enthusiasts.

View all posts by Matt →

Leave a Reply

Your email address will not be published. Required fields are marked *